It just isn’t Christmas without Rudolph the Red-Nosed Reindeer…and you simply can’t have Rudolph without Clarice!
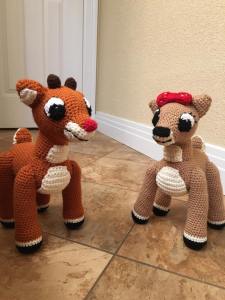
Clarice is a sweet reindeer whose bright red bow and smile are sure to light up your holiday season.
She’s a cuddly, huggable reindeer who stands about 12 inches tall. Rudolph stands about 14 inches tall, and together they make quite a pair. If you haven’t made Rudolph yet, you can find the pattern for him here. For my Clarice, the yarn I used was slightly lighter weight than what I used for Rudolph, so she naturally came out smaller. You could use the same weight of yarn and the same hook, and leave out a repeat or two in the body, neck, and legs if you wanted to adjust her size in that way. Otherwise, go down a size and make Clarice using a size F hook.
Though I have not had any official pattern testers for Clarice, she is based on the same pattern as my Rudolph, and several people have emailed pictures of their finished Rudolphs to me. If you make either of these happy reindeer, I would love to see your work!
Happy crocheting!
Abbreviations used:
sc – single crochet
dec 2 tog – decrease two together (sometimes called sc2tog)
F/O – fasten off
dec 3 tog – decrease three together (sometimes called sc3tog)
Supplies needed:
Yarn in the following colors: light brown, red, off-white, black, and white
Fiberfill
Yarn needle
Scissors
G hook (4.0 mm) (or F if you want to adjust your size that way)
Head – make 1, starting w/ light brown
1. 6 sc in ring (6)
2. 2 sc in ea around (12)
3. 2 sc in ea around (24)
4. *1 sc, 2 sc* around (36)
5. 1 sc in ea around (36)
6. *1 sc in 2, 2 sc* around (48)
7. 1 sc in ea around (48)
8. 1 sc in ea around (48)
Repeat row 8 (9 times)
18. *1 sc in 2, dec 2 tog* around (36)
19. 1 sc in ea around (36)
20. 1 sc in ea around (36)
21. 1 sc in 18, *1 sc in 1, dec 2 tog* 6 times (30)
22. 1 sc in ea around (30)
23. 1 sc in 15, *1 sc, dec 2 tog* 5 times (25)
24. 1 sc in ea around (25)
25. *1 sc in 3, dec 2 tog* around (20)
26. 1 sc in ea around (20)
27. 1 sc in ea around (20)
28. 1 sc in ea around (20)
29. *1 sc in 2, dec 2 tog* around (15)
30. *1 sc, dec 2 tog* around (10)
31. *dec 2 tog* around (5)
weave end thru 5, pull tight & F/O
weave in ends
Nose – make 1 in black
1. ch 5, turn, sc in ea across (4), turn
2. sc in next 4, make 2 sc evenly along side of nose shape, sc in next 4 on the other side of the nose, 2 sc evenly along remaining side of nose. F/O
Body – make 1 in light brown
1. 6 sc in ring (6)
2. 2 sc in ea around (12)
3. 2 sc in ea around (24)
4. *1 sc, 2 sc* around (36)
5. 1 sc in ea around (36)
6. *1 sc in 2, 2 sc* around (48)
7. 1 sc in ea around (48)
Repeat round 7 (29 times)
37. *1 sc in 2, dec 2 tog* around (36)
38. *1 sc, dec 2 tog* around (24)
39. *dec 2 tog* around (12)
40. *dec 2 tog* around (6)
weave end thru 6. pull tight. F/O
Belly – make 1 in off-white
**Note: with amigurumi, I prefer not to chain when I turn. This creates a straighter edge, which makes for neat assembly
1. Ch. 7, turn, sc in ea (6), turn
2. 2 sc, sc in 4, 2 sc, turn (8)
3. 2 sc, sc in 6, 2 sc, turn (10)
4. 2 sc, sc in 8, 2 sc, turn (12)
5. sc in ea across, turn (12)
Repeat round 5 until piece is long enough to go under body
– dec 2 tog, sc in 8, dec 2 tog (10)
– dec 2 tog, sc in 6, dec 2 tog (8)
– dec 2 tog, sc in 4, dec 2 tog (6)
– *dec 2 tog* three times (3)
– dec 3 tog F/O
Neck – make 1 in light brown
1. Ch. 30, sl st to join (30)
2. sc in ea around (30)
Repeat round 2 (8 times) F/O
Ears – make 4 in light brown
1. Ch. 9, turn, sc in ea, turn (8)
2. sc in ea across, turn (8)
3. 2 sc, sc in 6, 2 sc, turn (10)
4. dec 2 tog, sc in 6, dec 2 tog, turn (8)
5. sc in ea across, turn (8)
6. dec 2 tog, sc, dec 2 tog, sc, dec 2 tog, turn (5)
7. sc in ea, turn (5)
8. dec 2 tog, sc, dec 2 tog, turn (3)
9. dec 3 tog, F/O
**Note for assembly: Each ear is made up of two ear piece stitched together
Tail – make 2 in off-white
1. Ch. 9, turn, sc in ea, turn (8)
2. sc in ea, turn (8)
3. 2 sc, sc in 6, 2 sc, turn (10)
4. dec 2 tog, sc in 6, dec 2 tog, turn (8)
5. sc in ea across, turn (8)
6. dec 2 tog, sc, dec 2 tog, sc, dec 2 tog, turn (5)
7. sc in ea across, turn (5)
8. dec 2 tog, sc, dec 2 tog, turn (3)
9. dec 3 tog, F/o
Top of Tail – make 1 in light brown
1. Ch. 6, turn, sc in ea, turn (5)
2. sc in ea, turn (5)
3. sc in ea, turn (5)
4. sc in ea, turn (5)
5. dec 2 tog, sc in 1, dec 2 tog (3)
6. dec 3 tog, F/O
Legs – starting w/ black
1. 6 sc in ring (6)
2. 2 sc in ea (12)
3. 2 sc in ea (24)
4. BLO – sc around (24)
5. sc in ea around (24), switching to off-white
6. sc in ea around (24)
Repeat round 6 (24), switching to orangish-brown
8. sc in ea around (24)
Repeat round 8 – 2 times (24)
11. *sc in 4, dec 2 tog* 4 times (20)
12. sc in ea around (20)
Repeat round 12 – 20 times
33. *sc in 2, dec 2 tog* around (15)
34. 1 sc around
35. *sc in 1, dec 2 tog* around (10)
36. *dec 2 tog* around (5)
Weave end thru 5 and pull tight, F/O
Neck Fluff – make 1 in off-white
1. Ch. 8, turn and sc in 7 down (7), turn
2. sc in ea (7), turn
3. 2 sc, sc in 5, 2 sc (9), turn
4. sc across (9), turn
5. dec 2 tog, sc in 5, dec 2 tog (7), turn
6. dec 2 tog, sc in 3, dec 2 tog (5), turn
F/O
Muzzle – make 1 in off-white
1. ch 11, turn, sc in ea across (10), turn
2. sc in ea (10), turn
Repeat row 2 four more times F/O

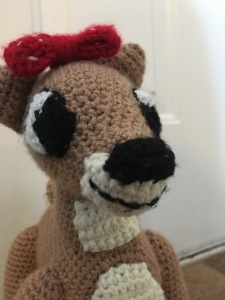
Eyes – make 2, beginning with black and switching to white at round 3
1. with black, 6 sc in ring (6)
2. continuing to work in the round, 1 sc, 2 sc, 2 sc, 1 sc, dec 2 tog (5) F/O, leaving long tail for sewing
3. join white with sl st at rounded end of pupil (as shown in pic above), with white, sc in same stitch as sl st join. sc in the next 4, sl st in last, turn, DO NOT CHAIN
4. skip sl st, hdc in next 5, sl st into round two to round out the white of the eye, F/O leaving long tail for sewing.


As you stitch the eye into place on your reindeer, the edges of the eyes will smooth out, making more of an eye shape. Use the tail of the black to sew on the black of the eye. Use the tail of the white to sew on the white of the eye. Using a small piece of white, you can stitch on catch lights if you want to.
Note: For a 3-D look, I outline the eyes with black yarn.
Assembly: using the pictures as a guide. Add stuffing to pieces as you go along.

For the bow, I used the tutorial over at Craftiness Is Not Optional. I did not glue the ends together. I stitched them together with my yarn needle and the tail that was left after crocheting the piece. With white, I stitched on details for the spots on Clarice’s bow.
This pattern is accurate to the best of my knowledge. If you find something that needs corrected, please let me know, and I’m happy to answer any questions if some come up while you are working. If you do decide to make this happy reindeer, please share your pictures. I’d love to see them!

A couple of cuties
LikeLike
thank you so much!
LikeLike
These are adorable!
LikeLike
thank you!
LikeLike
Hi love it but can you do it with the moth open
LikeLike
Where the arm piece got be a written pattern
LikeLike
The arm piece is the same as the leg piece. You will need 4 legs for the reindeer. I hope this helps!
LikeLike
They are so cute I will try to do this it would first
LikeLike